Flight routines to practice
What To Do After Take Off
Have you ever taken off only to find you have no idea what to do once you are airborne?
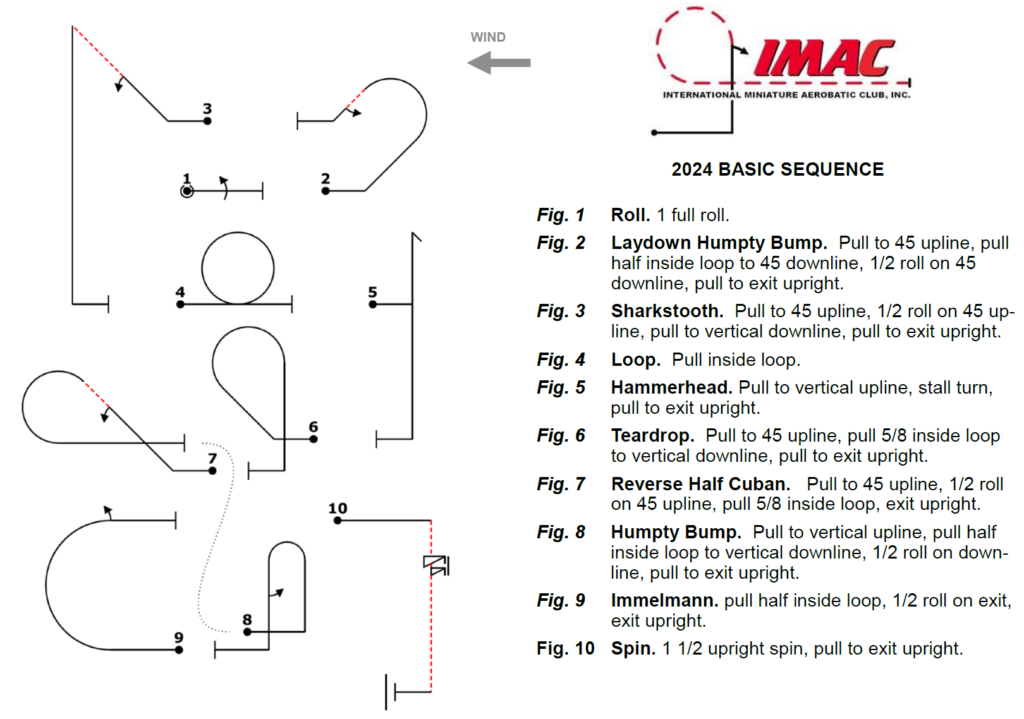
You might try the IMAC Basic Sequence. The International Minatare Aerobatic Club (IMAC) holds many competitions which can be quite competitive. There are 5 levels and the required maneuvers are very exactly defined for competition. I do not compete but I like the maneuvers, especially for the basic level. They change each year but usually include easy stuff I can do like loops, rolls, stall turns and even a 360° circle. They are not super exciting like 3D but done with precision can be very rewarding. The 10 maneuvers are linked so one maneuver naturally flows into the next creating a pleasing display of flying skills.
Typically I takeoff, check the trim then try to do the 10 maneuvers. This uses about half of my flying time. Rarely do I nail all 10 maneuvers so the remainder of the flight I practice the maneuvers I messed up or run the sequence a 2nd time. Learning to precisely fly these maneuvers is an excellent way to enhance your flying skills.
If you are interested head over to: Mini-IAC.org. Select downloads and look for the IMAC Basic Sequence-Call Sheet. You can download a pdf showing the maneuvers along with a short description of each. Note there are separate sheets for wind blowing left to right and for wind blowing right to left. I pick right to left and fly it regardless of wind direction so I do not have to learn 2 sequences.
The maneuvers are drawn using Aresti notation. This looks scary at first but do not let that intimidate you. Aresti notation is a worldwide standardized system to describe maneuvers. It was developed during WWII and used by full scale and RC aerobatic pilots today. Aresti can get complicated but for the basic sequence it is fairly intuitive. Example; #4 of the 2024 basic sequence is a loop. The Aresti symbol looks like a circle with a start point and end point – simple.
You will notice a large black dot on each diagram. This is the start point along with a number indicating the position of the maneuver in the sequence. There is also a short vertical line for the end point of each maneuver. Solid lines indicate normal flight while dashed lines are inverted flight. Rolls are shown by a curved arrow.
I use the far side of the runway as a distance guide to fly the maneuvers. The maneuvers are designed to be flown starting in the center of the runway then the right (runway West end) then to the left (runway East end). As an example the 2024 basic maneuvers start with a roll at the center field followed by a Lay Down Humpty Bump to the field right and flowing into the shark tooth to the left. This feeds into the loop center field, flowing into a hammerhead to the right.
You can use the call sheet mentioned above at the flight line as a reminder of what to do next. I find that an 8½x11 paper is a little unwieldy so I have reformatted the diagrams to fit on 3½x5 note cards. You can either print directly on card stock or print on regular paper and scotch tape to note cards. This is a handy size to fit in your pocket while flying. I even 3D printed a clip to hold the cards to my TX antenna for easy reference. Shown right are my cards from the 2019 Basic Sequence when I started using this technique.

No Comments yet
Sorry, the comment form is closed at this time.
©1997-2008 skypirates.org